Showing posts with label Travelling Gear. Show all posts

Monday 24 April 2017

Ultralight backpack for surprising travels and adventures


Preparing my backpack for surprising travels used to be one of my main headaches and time wasting moments. Every time I'll pack again, I'll do again checklists and often I'll miss something in the hurry and I'll be unable to deal with the more important issues around the travel. So I decided to do a checklist and have everything ready, just for a grab. Having that I can easily remember and deal with some specific items for the specific places, like additional clothing, sleeping mat for the mountains and others.
(Note: While this is not a Bug Out Bag, it has somewhat similar idea and can be used for one)
Check also: Ultralight backpacking

Here is the checklist in no particular order:
1. Documents, money, credit cards, travel tickets
2. Phone with charger and USB/miniUSB
3. 2 memory sticks
4. Solar charger
5. Camera & mini tripod
6. Map
7. Notebook, pen & pencil
8. Metallic water container (for boiling)
9. Plastic Bottle 1.5l
10. Walking stick (telescopic)
11. Small torch (flashlight)
12. Plastic bags
13. Survival tin
14. Waterproof sealable plastic bags for documents & phones
15. Pocket knife with saw
16. Small trowel
17. Sharpening stone
18. Wire
19. Paracord/rope
20. String
21. Fishing line on reel
22. Lighter
23. Tin can (for hobo stove)
24. Toilet paper
25. Soap
26. Toothpaste and brush
27. Sunscreen lotion
28. Underwear, socks, t-shirt with long sleeves
29. Swimming shorts
30. Shoes/flip-flops
31. Mosquito net
32. Insect repelant
33. Rain poncho
34. Spoon
35. Cooking pot
36. Small metal cup for coffee & instant coffee
37. Spare minimalistic backpack
38. Towel
39. "Bum bag"
40. Carbiner (attached on the backpack)
41. Plastic container
42. Woollen clothes
43. Cigarettes

Thursday 16 March 2017

Emergency shelter, fully enclosed tent with floor in less then 2 min, from square tarp


This is updated video of how to make an emergency shelter from single square sheet (6'x6' tarp). If done properly it can replace brand tent/bivvi, its done in less then 2 min and costs about £2. The weight with the pegs and the pole (can be used walking stick, too) is half kilogram (1lbs). Also the tarp can be used as hammock, rain-cape, etc.

It is one of the things that everybody interested in surviving and travelling through the wilderness must know how to do.

The advantages compared to the other set up (2x3 tarp/sheet) are that this one is a bit taller, so it is easier to sit inside and eat or have a cup, it uses only one pole, it is better closed and has smaller foot print.

Disadvantages are that being taller is easier to be seen, it is not so stable in wind, it is smaller and not so comfortable, there is need for a longer piece of string.

I used to do this more then 20 years ago in the army with my plasht (or as the Russians call it "plash-palatka"), which has the same size as standart tarp 1.8x1.8m (6'x6'). I think it was alright size 70 years ago, when most of the soldiers were 1.7m (5'7"), but today it is on the shorter side as I am 1.82m (about 6') and 7'x7' tarp (or other type of material) would be the right size for me.

This is only to show the idea how a square sheet can be folded in a pyramid and by no means a final and perfect shelter solution. There are many improvements that can be done, according each taste. If you have ideas for improvements or bettering the set up please write them in the comment section. Thanks.

Below photos and paper model showing how exactly is folded:

Fully enclosed tent with floor from square tarp, emergency shelter

Square sheet of some water/windproof fabric
Folding it, so we can find the middle of each side
Mark/fold the line between corner and middle of the corresponding side
Same for the other side
Another view to show better how it looks
Folding the line of the front flap
Sheet folded in the shape of the tent
For simulating pitching up, I used 2 pins to show where are the pegs, which will stretch and fix the sheet to the ground
For the pole which supports the tent I used toothpick. In reality it is a stick 1.4m long, from which 0.4m are nailed into the ground and is fixed with string/buttons/wire to the front flap. Also there can be used piece of string to pull the pole in the opposite of the pegs direction.
Another view

Thursday 9 March 2017

Emergency shelter, fully enclosed tent with floor in less then 3 min, from 2x3 tarp


This is updated video of how to make an emergency shelter from single 2x3 sheet (tarp). If done properly it can replace brand tent/bivvi, its done in less then 3 min and costs about £2. The weight with the poles (can be used walking stick, too) is half to one kilogram. Also the tarp can be used as hammock, rain-cape, etc.

It is one of the things that everybody interested in surviving and travelling through the wilderness must know how to do. This is updated video of how to make an emergency shelter from single 2x3 sheet (tarp). If done properly it can replace brand tent/bivvi, its done in less then 3 min and costs about £2. The weight with the poles (can be used walking sticks instead) is half to one kilogram. Also the tarp can be used as hammock, rain-cape, etc.

It is one of the things that everybody interested in surviving and travelling through the wilderness must know how to do.

Also, another set up with a square tarp and one pole.

Below you can see the correct proportions, so if anybody wants to do it in higher quality version.

Sizes
Folds
A fold to give sense of shape and proportion
Folded paper model, "d" is where one of the supporting stick will be fixed and the other one will be on the opposite  side
Folded model, side view

Thursday 9 February 2017

Travel gear - Swiss army knife - short overview


The Swiss army knife is one of the most important pieces of gear I carry with myself when I travel in the wild. However, while the main blade and the wood saw are vital I rarely need the rest of the tools and when I have to find replacement, for example after flying, I usually buy whatever pocket knife I can find as long as it has a wood saw.

Tuesday 14 June 2016

Traveller survival/convenience tin


I carry this tin normally when I am out of cities and towns. Its not so much preper/survival tin, but rather small, easy to carry around box with a few convenience items, that I need often.

The items are:
1. Tin, aluminium, water tight, flat enough to be carried easily in belt pouch, size is exactly to fit a passport if needed.
2. Wire-saw
3. Condoms - 2 pieces
4. Fishing line - several metres
5. Fishing hooks 3 pieces, different sizes
6. Cotton
7. Pencil
8. Snare wire
9. Green wire - 3m
10. USB to mini-USB cable
11. Mini Carbiner
12. Compass with ruler
13. Tweezers
14. Salt
15. Dremel cutting blade
16. Plasters - 2 pieces
17. Mini Multi-tool with pliers, knife blade, saw, torch, screwdriver, bottle opener
18. Candle
19. Lighter - Clipper small
20. String, strong several metres
21. Sharpening stone
22. Torch with crank
23. Plastic fishing bait
24. Mirror
25. Sealable, strong transparent plastic bags - 2 pieces
26. Saw blade for metal
27. Painkillers
28. Antibiotics (doxycycline)
29. Water purifying tablets And last I am thinking of adding mini memory stick with bootable Linux (Ubuntu) and some important files, which stick I normally carry in my pocket.

Friday 3 June 2016

Essential skills and crafts needed for survival in the wilderness - overview

While thinking how can be achieved in minimalistic way the walk around the world, started to wonder how it was done originally, when the humankind spread across the globe. So I came down to the question how to cover the basic need for survival: clothes, shelter, food, water. There is going around the rule of the three for the importance of each of these. It sounds something like that:

One can't survive more then:
a) 3 minutes without air or warmth (icy waters or extreme cold)
b) 3 hours without shelter in harsh environment
c) 3 days without water (if sheltered from harsh environment)
d) 3 weeks without food (if there is shelter and water)

First point is obvious, we should avoid any possibility we'll be left without air. Normally this is not issue, but if it happens to come across situation like that we have to try to prepare ourselves accordingly. This may happen on sinking boat, under avalanche and some other cases, which are not really the topic of this post.

Second one is of great importance and normally can be addressed with proper preparation, because if we happen to be in harsh environment unprepared it may be is too late. However there are still things that can be done in some cases. For example during the winter in snow storm we can build igloo-type shelter just in time to save ourselves, or if there is no snow we can dig out hole in the ground and add some rocks and branches for additional cover. Still better if we are caught in the wild without shelter, but the condition in the moment are not so bad (its sunny day still) we may have time to build proper shelter until the fall of the night/arrival of the storm/etc. Here is coming handy knowledge how to build igloo, zemlyanka, tent, mud&rock house and other appropriate shelters. So we came across the first batch of essential skills and crafts. In my opinion most people should be able to do decent job even without much previous knowledge, because all of these are relatively simple and what is needed is a little bit  of common sense and experience with tools. However we'll need something for digging out and cutting like shovel and machete/axe. Actually I am going to look for the best tools for the task and there may be even some good hybrid option. In that line of thought may be we'll need some knowledge of tool-making, for example flint knapping for making stone hand axe, hand spinning for making string from some plants or other fibre, so our axe can be upgraded with handle. Also in this category we may include the clothes, because even if they are not shelter per se, they may offer in many cases enough protection to allow us to survive the harsh environment. So here we came to the need to be known not only the craft of the spinning, but also weaving. With weaving we can make clothes, tarps, tents and other essential for survival items.

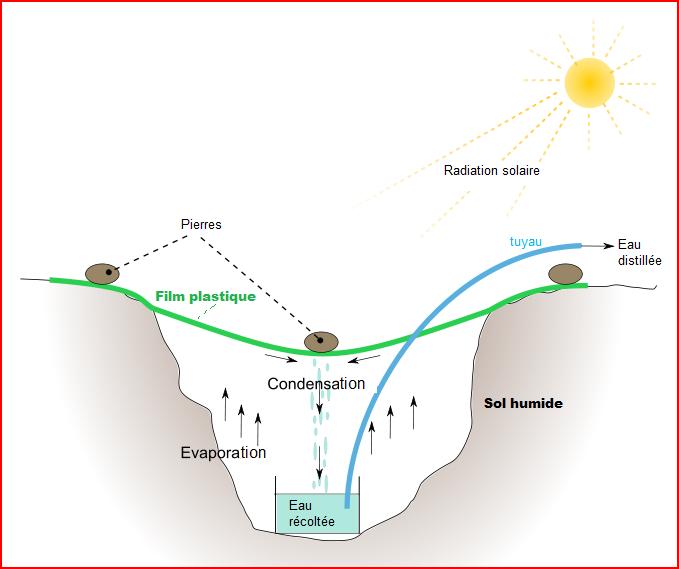
Once we made sure we are protected from the elements we should think about the water. There are few cases in which we may be left without water. The first situation is if we are in some kind of dessert without any obvious water in any form. That is the worse case scenario, but there are still things that can be done. First we should try to find any kind of plant, the easiest way is just to squeeze some water form them, but if its too woody of we are not sure about poisons, we may cook it in something closed and to drink the evaporated and condensed water. If that is not an option we may try to do a condensation trap (which is essentially desalinating tool) and so on. Another situation could be that we have access only to non-drinkable water like, which is going to be much easier to be solved with proper knowledge and preparation.

In cases like that I think we have to learn the exact methods of harvesting water with primitive and modern technologies and if possible always to carry with ourselves some items and tools, like big enough clear plastic sheet, pot with lid (for fire distilling) that facilitate the process. Here I am not yet sure the knowledge of exactly what crafts are going to be needed, if any, but I'll update in future.

Condensation trap   Image Courtesy: Wikipedia

And the last is the food. Here I guess that we'll need to eat plants and animals found in the nature. with the plants, the case is relatively simple, we just have to find them and forage. We may not need too specialised tools for the gathering (probably shovel for digging out roots and some pots for cooking), but we need extensive knowledge of what can be eaten, how to find it and how to prepare it. The problem with the plants is that most of them are either poisonous or not edible and even many of the edible ones can't be eaten without the appropriate preparation. The animals on other hand are kind of the opposite case, near all of them can be eaten raw and are much easier for digestion and more nutritional. However there is the problem how to catch them. In nearly all cases we'll need some special weapon or trap and this are going to be essentially the crafts needed.

Lets start with fishing, we can catch fish with hook and line (for this we need to know spinning and weaving), nets (spinning, weaving and special net-making), blind baskets (basket weaving), spears, harpoons, arrows (bow and arrow making), fishing with hands (needed experience), damns, poisoning and many, many other methods.

Next are the birds and mammals, they can be caught with nets, snare-wires, traps, projectile weapons, throwing weapons and others. I guess we need to know how to craft and use all of these weapons and things.

Last I think are the invertebrates. Some of them are not edible, but these that are may turn to be the best and most accessible source of food. There are survivalists that ignore them, but I think its mostly cultural thing. Invertebrates in most of the cases can be harvested very easily and are actually very tasty and nutritious. Some like snails or prawns are even delicacy. I'll look further into this and I'll make some experiments.

Anyway the topic is just too big to fit it in one post, so I am giving only overview here and more detailed information will come in separated articles.

Links:
rules-of-3
Zemlyanka 
Knapping
Hand spinning
Condensation trap

Sunday 29 May 2016

Walk around the World - Essential gear check-list (minimalistic approach)

So, if we want to go on walk around the world, we can do it in a few ways. As seen in other cases people can do it in civilisation dependant way or like off-grid survival exercise. For example Jean Béliveau made something like long hike without really leaving behind the comfort of the civilisation, in sense he stated that he slept 1/3 of his time in randomly met families, another 1/3 in some kind of shelter like churches or mosques and about one third on his own, also for food and other essential needs he relied on help from other people like his wife. Currently I can't find examples of people doing around the world walk with really minimalistic set up, like finding food by himself, not accepting help, shelter and clothes, however it can be done like its demonstrated by many paleo-lifestyle and wilderness survival enthusiast. May be such way to complete the travel will teach us about the way the humanity spread around the world in ancient times, when I imagine we were all nomadic hunter-gatherers.

Let say we decide to do it with zero money and we have to relay only on what we can find and make for survival all this time. That is going to be good idea, because it will be proof of concept, for which I'll write more on separate post. On side note in our time minimalistic and cheaper probably means using some stuff like plastic and so on because its cheaper and much easier to access then the original materials supposed to be used like animal skins and so on. Sadly 21 century is time when the plastic is basically free and the animals are next to non-existent.

First task is to make list of all essential gear needed for survival on our own for indefinite amount of time. I found few lists and I'll try to compose my own. After completing the list I'll have to try to make it all fit in medium sized backpack not heavier then 10kg (22lbs) including food and water. After a few days spent in the wild by myself I came with this first draft of the list:
  1. Cell Phone (capable of radio reception)
  2. USB to miniUSB cable (in the survival tin)
  3. USB charger
  4. Memory stick with bootable Linux and important files, passwords, etc (in the survival tin)
  5. Solar charger
  6. Camera (best to have one action camera and one for photos with tripod)
  7. Sound recorder
  8. GPS 
  9. Compass (in the survival tin)
  10. Map
  11. Small notebook and pen and pencil
  12. Binoculars (I'll think more about that, it may be necessary)
  13. Water storage - Metal Canteen
  14. Water storage - Plastic several litres
  15. Condom (for back up water storage) (in the survival tin)
  16. Water filters and purification (in the survival tin)
  17. Straw or thin tube
  18. Plastic sheet for gathering water
  19. Longer walking stick (1.2-2m) that is, or can be converted to spear or tent pole
  20. Flash-light (in the survival tin)
  21. Mini multi-tool (in the survival tin, may need to be bought every time after airplane fly) 
  22. Pocket Knife (in the survival tin, may need to be bought every time after airplane fly)
  23. Small shovel (may need to be bought every time after airplane fly)
  24. Sharpening stone (small is enough) (in the survival tin)
  25. Cutting wire or better small saw or axe if possible (in the survival tin)
  26. Snare wire 2m (or other suitable thin strong metal wire) (in the survival tin)
  27. String (para-cord) tick and thin 
  28. Lighter (in the survival tin)
  29. Back up method for fire starting (magnesium block for example) (in the survival tin)
  30. Small candle (in the survival tin)
  31. Tinder (for fire starting)
  32. Portable Camping Stove
  33. Pepper or Bear Spray
  34. Projectile weapon, best some type of firearm (if possible)
  35. Slingshot and replacement bands
  36. Fishing line (also learn how to weave special blind basket) (in the survival tin)
  37. Fishing hooks (in the survival tin)
  38. Sunscreen
  39. Alcohol swabs (in the survival tin)
  40. Painkillers (in the survival tin)
  41. Antibiotics (doxycycline) (in the survival tin)
  42. Adhesive bandage (plaster) (in the survival tin)
  43. Soap
  44. Cotton ball (in the survival tin)
  45. Needles (in the survival tin)
  46. Several metres strong thin string (for sewing, tying, etc)  (in the survival tin)
  47. Tweezers (for removing ticks and thorns) (in the survival tin)
  48. Mirror (for self-examination for parasites, injuries, signaling, etc) (in the survival tin)
  49. Dust and chemical protection mask
  50. Gloves (thick and strong, pierce resistant)
  51. Insect repellent - spray
  52. Tarpaulin 2x3m sheet (to be used as hammock and rain-cape also)
  53. Blanket
  54. Survival reflective bag (to be used as sleeping bag if low temperature)
  55. Inflatable ground cover
  56. Mosquito net
  57. Rain poncho
  58. Eating and Cooking Utensils
  59. Small cooking pot
  60. Metal cup for making tea or coffee
  61. Salt
  62. Backpack
  63. Plastic bags (shopping)
  64. Small plastic bags - 5x10cm (for keeping things) (in the survival tin)
  65. Wide Brim Hat 
  66. Sunglasses 
  67. Shoes
  68. Flip flops
  69. Jeans
  70. T-shirt with long sleeves 
  71. Belt
  72. Underwear
  73. Socks
  74. Bath suit (short swimming pants)
  75. Small paper envelopes (for keeping seeds and plan specimens)
  76. Small box
  77. Small waist bag
  78. Carabiner 
  79. Money 
  80. Personal Identification Papers in waterproofed plastic bag or sleeve 
  81. Survival tin (part of the items from the list will fit inside)
This list is going to be tested further and updated soon


Sources:
dailymail - 75 500km epic 11 year odyssey
http://wwwalk.org/en/
6 travellers who walked around the world
http://offgridsurvival.com/101survivalgear/

Tuesday 24 May 2016

Tent from single square tarp sheet, enclosed with floor for £2


After receiving e-mails and questions how exactly I configure and pitch up my single tent-cape I realized that it may not be so obvious, so I decided to upload this video in which I am showing to a friend of mine - Karen how to do it. I hope now is clearer how this is done.

In short, 2x2 m (6x6 ft) tarp (tarpaulin or any other waterproof and strong enough material cut at square), stick 1.2 m (or 4 ft), 3 pegs (or just sharpened pieces of wood) and piece of string 1.5 m long are used and the pitching up should take only a couple of minutes if practiced. It could be used as rain-cape (similar to the "plash palatka") or hammock, weights around 250 gr and is very compact and light compared to the retail tents.

And just to note in the video the sides don't align perfectly, because this tarp was not exactly a square and the eyelets were not evenly spaced, but its still good enough for £2 tent. However if anybody wishes to invest some time, it can be cut to proper size and the eyelets can be realigned and the result will be very neat fully enclosed tent.

This smaller configuration has some advantages like its easier to use as rain-cape, its a bit higher, so one can sit inside somewhat comfortably, uses single pole and needs smaller spaces. The disadvantages are that it is not so comfortable, higher (easier to be seen) and when used as hammock not very comfortable, because is shorter.

For exact proportions and folding geometry look at Single Tent Cape
For videos about the configuration of double tent see 2x3 Single Sheet Tent and 2x3 Tent - rain test

Monday 23 May 2016

Tent from single 2x3 tarp sheet, enclosed with floor for £2


After receiving e-mails and questions how exactly I configure and pitch up my double tent-cape I realized that it may not be so obvious, so I decided to upload this video in which I am showing to a friend of mine - Karen how to do it. I hope now is clearer how this is done.

In short, 2x3 m (6x9 ft) tarp (tarpaulin or any other waterproof and strong enough material cut with sides 2 by 3), 2 sticks at 1.2 m (or 4 ft) each, 2 pegs (or just sharpened pieces of wood) and piece of string are used and the pitching up should take only a couple of minutes if practiced. It could be used as rain-cape or hammock, weights around 350 gr and is very compact and light compared to the retail tents.

And just to note in the video the sides don't align perfectly, because this tarp was not with sides 2 by 3 exactly and the eyelets were not evenly spaced, but its still good enough for £2 tent. However if anybody wishes to invest some time, it can be cut to proper size and the eyelets can be realigned and the result will be very neat fully enclosed double tent.

For exact proportions and folding geometry look at New Tent Design
For my previous video about testing it in rain this tent see here.
And for a video about pitching up and configuration of the single tent see Single Tent Cape.

Friday 13 May 2016

Single Tent-Cape paper and life-sized models

In some of the previous posts I showed models and use of my double Tent-Cape, but there was another manner of folding sheet of fabric in the form of tent, which I used when in need during the last 20 years. This type of tent uses square sheet of waterproofed fabric (tarp) with sizes 2x2m (which is most suitable for my height of 1.8m, but in a pinch I would use 1.8x1.8m/6x6ft). This tent is much shorter and not very comfortable, but is simpler, uses smaller square sheet and allow me to sit inside. This sheet can be used as hammock and rain-cape also.

The pitching up requires first to pin down with a peg one of the corners, after that to stretch the sheet and pin down the middle of the opposite side. After that fix down the pole, which is longer then the half of one of the sides, After that tie the front flap to the pole and preferably tie to top of the pole with string to peg in the ground, which will pull against the first 2 pegs.

I guess for somebody it may not be very clear this explanation and I'll do video of how the pitching up is done some of the next days.
Square sheet of some water/windproof fabric
Folding it, so we can find the middle of each side
Mark/fold the line between corner and middle of the corresponding side
Same for the other side
Another view to show better how it looks
Folding the line of the front flap
Sheet folded in the shape of the tent
For simulating pitching up, I used 2 pins to show where are the pegs, which will stretch and fix the sheet to the ground
For the pole which supports the tent I used toothpick. In reality it is a stick 1.4m long, from which 0.4m are nailed into the ground and is fixed with string/buttons/wire to the front flap. Also there can be used piece of string to pull the pole in the opposite of the pegs direction.
Another view
Real life sized model from tyvek (few months ago somebody wanted me to show him how it looks and I made this then and took picture)

Monday 9 May 2016

Pitching up my Tent-Cape and rain test


I made this short video to show how to pitch up my tent-cape. I made this in wind and it took alltogether with cutting and sharpening the four supporting sticks couple of minutes. After that the rain started and there were no leaks so I decided to spent the night in the tent and seems the nature of this type of folding sheets makes it not only waterproof, but also warm and wind resistent.

Wednesday 27 April 2016

New tent-cape design

For travelling I wanted to have my gear as light and versatile as possible. The first item in my list was shelter/tent and the lightest one was about 2kg and couldn't serve for anything else and inspired by the plash palatkas I decided to design kind of tent that could be used also as cloak/raincape, hammock and possibly kayak. I stumbled through few iterations, but finally I settled to the one shown on the pictures. It is going to be rectangular piece of waterproof light material with sides 2:3, which for my size should correspond to 1.6m by 2.4m. Pitched up it will have roughly as sizes 2.9m length, 0.9 width and 0.7 height, which is rather a small tent or even better said bivvy. Also it will be possible to be sealed near hermetically with waterproofed zips and instead of standard hoop it will use simply 2 walking sticks pegged into the ground and supported by 2 small pegs which also will stretch the whole thing diagonally. And finally, I tried it and while not superior experience it is still comfortable enough to allow you multi-day camping and the advantages of this type of tent far outweigh the weak points, at least for my needs.

On the pictures bellow you can see some drawings, paper models and real-life sized model. Some of the next days I'll post more updates and information about that project.

Sizes
Folds
A fold to give sense of shape and proportion
Folded paper model, "d" is where one of the supporting stick will be fixed and the other one will be on the opposite  side
Folded model, side view
Real-life sized model
tent-cape with flap down
Real-life sized model with the flap down